 Shop Online
|
QUAD FLAT PACK (QFP) REWORK AND REPAIR PROCEDURE
Figure #2a
Figure #3
Figure #3a
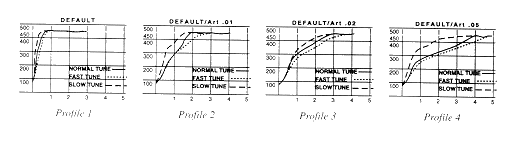
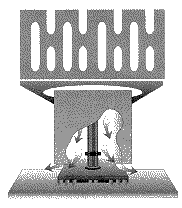
4.2 To select Profile #2, from the “Operator View Display” (Figure 4) press the INDEX key on the controller ONCE to enter the “Operator Menu” then press the INDEX Key, ONCE more, to reach the “Profile Field”; then press either the “UP” or “DOWN” arrow to reach the desired Profile, (RED L.E.D. display). Then press ENTER. Press the INDEX key THREE times to return to the “Operator View Display”. See Chipmaster Manual for complete explanation of controller and features. Figure #4
5. Eutectic Removal Procedure 5.1 Set the temperature control on the Chipmaster TM to 440°F, and set the timer to zero by the following procedure: To set or change Set Point temperature, from the “Operator View Display” press the INDEX key on the controller once to enter the “Operator Menu” then press the INDEX key, TWICE, to reach the “Temperature Field” ; then press either the “UP” or “DOWN” arrow to reach the desired temperature (RED L.E.D. display). To do this, use the “UP” arrow to increase: hold the button in to increase rapidly. To increase temperature in one degree increments, press the arrow button in individual steps. The same procedure works for the “DOWN” arrow button. Then press ENTER. Press the INDEX key twice more to return to the “Operator View Display”. See Chipmaster Manual for complete explanation of controller and features. 5.2 To reset the timer to zero, in the “Operator View Display” press the ENTER key and the “DOWN” arrow key simultaneously. The display will flash once, indicating that the timer has been reset to zero. 5.3 How The Timer Works: If the timer is reset to zero, it will START counting UP once the heat cycle begins (Foot Pedal pressed) and will STOP counting once the cycle is stopped by the operator (Foot Pedal released). The timer will display the cycle time, e.g., 1: 45 minutes, or whatever. Each time the foot pedal is depressed to start the cycle thereafter, the timer will count DOWN to zero from whatever cycle time (in this example, 1:45 minutes) was recorded. This is the Timer procedure used for Eutectic Removal. The procedure for changing cycle time is similar to setting temperature, Press the INDEX key ONCE (from the Operator View Display) to enter the “Operator Menu” and reach the Timer field. Use the “UP” arrow key to increase time in one-second increments; hold the key down to increase rapidly. Once the time is set, press ENTER; then press the INDEX key FOUR times to return to the “Operator View Display.” When a specific time has been set, e.g., 2:05 minutes, the Chipmaster’s Timer counts down to zero once the foot pedal to start the heat cycle is depressed. The timer will stop at zero, even if the heating continues (foot remains on the pedal). For Eutectic Removal we do not set time to remove a component, as the time will be recorded once the component is automatically removed and the Foot pedal released. However we will change (add) time to replace a component using this process.
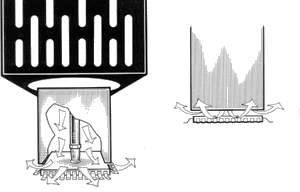
5.4 Install Nozzle #6680334E75, 1.40″ x 1.40″ (35.6mm x 35.6mm) for a QFP208 in the Chipmaster, or appropriate nozzle for any other size component. 5.5 Using the no-clean flux paste provided in the SMT Tool Kit apply a thin 0.025″ line around the leads of the component, ensure all leads have flux applied and note the orientation of the component for installing a replacement. 5.6 Place the board in the Board Holder, as described in the Chipmaster manual and center the component under the Chipmaster Nozzle. The body of the component should be between 1/8″ to 1/4″ (3mm to 6mm) below the base of the nozzle. (Figure 6)
5.7 Depress the foot pedal to start the heating cycle. Note that the GREEN display will begin “counting” the seconds while heating. The RED display will indicate the heated air temperature as it ramps. 5.8 Turn on the vacuum pump, then depress the Vacuum Pickup Assembly to capture the component. The component will not, however, lift off at this time. 5.9 Once the component leads achieve eutectic condition and after approximately 2 minutes 25 seconds of heat application using Profile #2, the component will automatically rise from the circuit board by the tension applied by the Vacuum Pickup Assembly and be drawn up into the nozzle of the Chipmaster. Release the foot pedal to stop the heating cycle. The GREEN timer display will stop counting, and will record the length of time elapsed. 5.9.1 Depress the board holder piston (cylindrical top of the board holder); remove the entire board and holder from beneath the nozzle assembly by sliding the whole assembly sideways and out from beneath the nozzle. Let the component cool for a while and with a flat surface, such as a small card, place the card under the nozzle, turn off the vacuum pump, using the switch on the front of the Chipmaster. The component should release and drop onto the card.
6. Reinstallation of Components 6.1 Hot air level the pads. In most instances, sufficient solder will remain on the pads to attach a new chip; but the surface may be rough, uneven, or have solder “icicles”, making accurate placement of a new chip impossible. To hot air level, Locate the circuit board (still in the Board Holder) under the nozzle, with the component removed, depress the foot pedal to begin the heating cycle. It is recommended to add a little more flux to the contact area to ensure thorough wetting. Don’t worry about flux residue as the cleaning process described in 6.3 will remove residues. The GREEN display will begin counting DOWN to zero. The solder will melt and become smooth; the solder should cover the pad(s) completely, with a slightly rounded “pillow” shape.
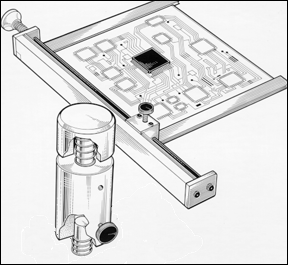
6.2 Remove the board and board holder assembly from beneath the Chipmaster nozzle (depress cylinder, slide holder and board out). Let the board cool. 6.3 Using the Cleaning Fluid Pad Prep Pen from the SMT Tool Kit, release sufficient fluid by depressing the valve at the tip to soak the area, and use the cleaning tip procedure to clean entire contact and surrounding area. Use an Antistatic wipe #6680334E14 to finally remove all traces of contamination and old material. 6.4 If there is insufficient solder to cover the contact pad(s), add solder using wire solder or solder paste and a soldering iron. Apply no-clean paste flux to aid wetting and clean afte1Wards with Pad Prep Cleaner as in 6.3. 6.5 Now that the contact pads are coplanar and free of all residues and contaminates, apply a thin line of no-clean paste flux (0.025″) around all contacts. With the double-sided “clean and flux” brush supplied in the SMT Tool Kit, use the softer and longer flux brush end to brush the flux from outside the contacts to the center, ensuring all contacts are adequately fluxed – it’s important that too much flux is not applied otherwise the component will float off position during reflow. 6.6 Now, take a new component, (the removed component may be reinstalled if required, providing leads are coplanar), and holding the center of the component between thumb and forefinger of the right hand and with clear view of the entire left hand side and half view of the top and bottom of the component, place the component, aligning the Y axis (left side) and then gently aligning top and bottom half sides. A small hand 2.3 dioptic magnifier #6680334E13 held in the left hand easily provides all the vision needed to align. Once the component is in place gently release the chip out and away to the right. The flux will support the component. Probes supplied in the SMT Tool Kit will aid fine alignment or the entire alignment procedure dependent upon personal preference. Aligning one full side and two halves should align all four sides but each lead must be exactly centered over the contact pads. The no-clean paste flux will hold the component in place during reflow (melting) of the solder. This flux will dissipate, however, by the completion of the heating cycle. The component corners may be tagged with a soldering iron for extra support prior to reflow, if so desired. 6.7 Place the board under the nozzle of the Chipmaster, being careful to center the component under the nozzle as accurately as possible. 6.8 Press the INDEX key on the Chip master controller ONCE, and verify the eutectic (Removal) time, then add twenty (20) seconds to this eutectic time to provide sufficient time to reflow the entire component. Use the UP arrows as described previously and press ENTER to save the change. Press the INDEX key FOUR times to return to the “Operator View Display”. 6.9 Depress the foot pedal to begin the heating cycle (Figure 7). When the timer reaches zero, the reflow is complete. Wait for the solder, component and board to cool, then remove the Board Holder and inspect your work.
. (Figure #8)
|
||||
 Figure #1


Like Us


